Wednesday, April 24, 2013

As Seen on Pinterest - Re-grow Your Kitchen Scraps

One day while browsing Pinterest, I cam across pictures from someone who had re-grown a bunch of veggies from kitchen scraps.  I would be lying if I said I wasn't obsessed with this idea. There are lots and lots of examples of this working out there in blog land.


http://www.savvystudentshopper.com/blog/2012/05/22/regrowing-your-produce-free-easy/


I thought this was just the coolest thing and HAD to try it!

After making a salad last week, I very carefully saved the little bit of lettuce on the inside of the romaine.  I chopped the stump to make it fresh.  I dug a spot for it in the planter that currently holds my dead basil.   I SWEAR, that the middle bit of it has grown since I planted it on the weekend.  It is definitely a darker green.   

regrown romaine lettuce kitchen scraps

I am also celebrating the official survival of my rosemary through the winter.  My chives have grown a fabulous amount in the last month or so.  They are all green and spikey now!


This is what they looked like about a month ago!  How is that for gardening progress for someone with a black thumb!


Have you successfully re-grown veggies from kitchen scraps?  If you have, I would love to see them or hear your story!  I have some sad looking celery in the fridge that might just get this treatment in the next day or so because celery is apprently a good candidate for this method.

I really want to expand not only my veggie growing this year by hopefully growing lettuce, tomatoes and carrots but also expand my herb selections.  

Tuesday, April 16, 2013

How I'm Feeling RIGHT Now

My son lead me to this and I must say I'm feeling like this right now.  I have been on the prowl for a job and have had a few calls but nothing of substance has materialized.

DS reads the Joystique gaming blog.  Every now and then he shows me posts that he finds interesting.  Sometimes they are even intersting for old women like me who have teenage sons  This Zac Gorman cartoon jussst about sums up how I'm feeling these days!


Now if someone could just tell me what is in that box with the questionmark, I'd be cooking with gas.

Sunday, April 14, 2013

Spring Inspiration and a DIY Found Rock Inuksuk


The other day, in the depths of this horrid, endless winter we're having, I noticed a little bit of purple lurking under a pile of oak leaves.  I decided to go out and investigate today (and clean up a little) and found this!  Proof positive that spring indeed IS coming!  

Yippie!  


crocus garden spring
I never planted crocuses in my garden.  This one just appeared a few years ago.  I figure a squirrel drug it up and dropped it and I am the lucky recipient!  I love crocuses.  I really should plant some more.  They are such a nice happy sign of spring!

Hubby and I went out for a date night last night.  We walked past a cute little garden shop.  The had these little piggy planters.  How cute are these?  A few of these would make the cutest herb garden!  I would LOVE one but at the moment I have no clue where I would put it.  I just love garden art!

pig garden planter


There is a spot on our beach where people balance rocks.  They are not qiute Inuksuk but speak to that general idea.  An inuksuk is Inuit stone sculpture of a "human" that tells you you are on the right path.  I have always been fascinated by these.

Rock balancing Toronto beaches
Rock Balancing
I gathered a few stones off of the beach and brought them home.  

Lake Ontario rocks

I took a few and stacked them up and made myself a mini Inuksuk.

found rock inuksuk rock blanacing

Two feet.


a base...

a body which is part of a red brick worn smooth by the water


arms


and a round head

inuksuk canada inuit

The trick to getting it to stand is picking flattish rocks.  He stands about 15" high.  I think he is a pretty cute piece of free DIY garden art.  He is quite stable and only falls over about once a year.

oak acorn garden

If only I could figure out how to get the squirrels from burring acorns in my garden. 

hyacinth bulb flower garden

 My hyacinth was completely burred under leaves and is a bit pale looking.

hydrangea old bloom dried

Last years hydrangea bloom.

Thursday, April 11, 2013

Totoro Quilt Part Two

Just a quick post with a few more, better, Totoro quilt pics.

The only place I have in my house that is big enough to lie anything this size out is my garage floor.


I spent the weekend ironing on my garage floor.  Yup fun stuff.


I have had this green zen looking fabric for ages.  The current plan is to bind this in a solid green.


Woof!  She is eyeing lying on it.  


Sunday, April 7, 2013

Totoro Quilt Tutorial


My oldest son is a HUGE, and I mean HUGE Totoro fan.

He asked me ages ago to make him a Totoro quilt.  I looked around the internet and couldn't find anything I really liked.  Making something with a kitsch character for a teen is hard.  So many of the things I found were cutesy vs kitsch.

My friend and I went to West Elm the other day for our spring visit.  I'm not a huge fan of their furniture but I do quite like their linens.  I only had to take one look at this wide rugby stripe duvet to know I had a jumping off point for the Totoro quilt.  I don't think anyone would argue that rugby stripes are manly.

west elm duvet cover


A quick google after I got home found me some images of Totoro and a plan to print some fabric.  I discovered that a regular old ink jet printer can print on fabric.  All you need to do is press the fabric on some freezer paper.

iron freezer paper

Cut it into 8 1/2 by 11" sheets.


And print!

Totoro dust mites quilt

Tororo quilt images

I sprayed the prints with spray matte medium to seal in the ink and gave them a rise in the sink.  


They faded a bit but nowhere near as much as I would have thought! The fabric is soft and flexible.

I used two Ikea sheets, one grey one white, cut into 11" strips.

Ikea bed sheets grey
 I sewed them together in alternating stripes and fitted in Totoro and the dust mites.


Totoro quilt

My son is 17 and all about subtle.  He was thrilled with this!  I knew he wouldn't want something that screamed kid quilt.  Subtle and animation usually don't go hand in hand but I think this fits the bill quite nicely.

FOLLOW UP:

I made this a couple of years ago.  Alas, the printing method wasn't all that great.  It faded.  The quilt is still lovely but the Tororo is not what he once was.  When I can get my hands on it for a little bit, I'm going to use some embroidery floss and stitch in the Totoro.

Saturday, April 6, 2013

Kitchen Knob Tutorial

I have a friend who lives in a builder house in Arizona and every time I see a picture of her kitchen I notice her doors have no knobs and no pulls.  I'm not sure if its a regional thing or yet another way for a builder to cheap out and reduce costs.  I can't imagine living in a kitchen that doesn't have something to grab hold of to open doors and drawers with.

I thought a little tutorial on knobs and pulls might be in order today.  So lets bring on the bling...

In the beginning....

My lovely oak kitchen had THESE knobs when we first bought it.  I couldn't get past them looking like buttons on a winter coat from the 1970's.  Yeuch.

ugly oak wood kitchen knobs


Knobs and pulls on your kitchen are the jewelry of your kitchen.  They are not only pretty, they are functional.  You can dramatically change up the look of your kitchen with swapping out knobs or in the case of my friend, just adding some.

Knobs

Knobs can be used on both doors and drawers.  Knobs generally are the most cost effective option.  I opted for "glass" knobs that came in a builder package I found on clearnace for $8 for 5 knobs.  I paid approx than $30 for the 17 knobs I needed.  

kitchen glass knobs pertty

My doors had been predrilled by the builder for the granny knobs.  I stuck with the same holes because of this - yeah no drilling.  

If your doors/drawers aren't drilled, you need to decide on where your going to place your knobs.  Mine are squared off between the bottom two corners.  Easy peasy.  The other option is to put them a bit higher on the vertical style.  Like addicted2decorating did in this pic...


Depending on the style of knob you choose you can lots of different looks...
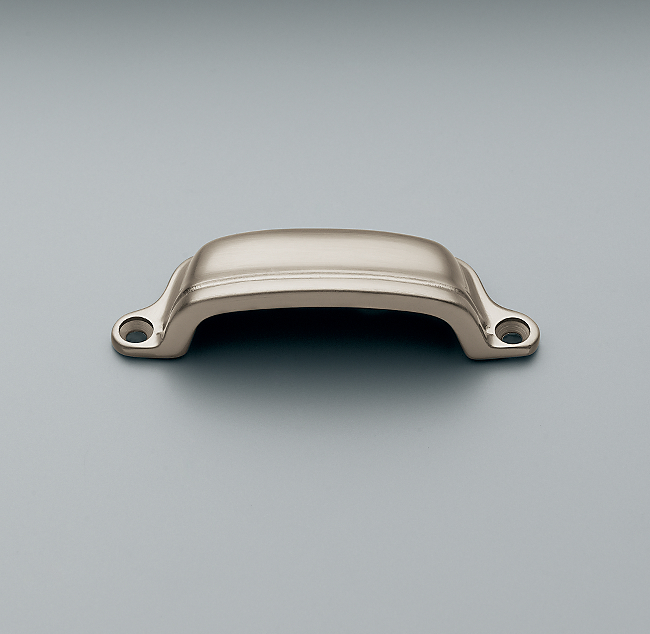


Drawer Pulls

On drawers, you can use knobs or change it up a little and use pulls.  Drawer pulls are great for a grab and go cook like me.  My hands are often full and I like having something a bit bigger than a knob to yank.  I bought Restoration Hardware Gilmore drawer pulls for my kitchen.  They were pricey but I needed far less of them that the knobs.  I used them on each drawer and on my pull out cabinet.  I love these because they have a very rectangular feel to them.  I have to warn you though, the screws that come with these are horrible and break super easily.  The grusome details can be found here.

Restoration Hardware Gilmore Drawer pulls

restoratin hardware gilmore drawer pulls

I really love this one that looks like its been around the bend a few times.  This could look amazing on a mis-matched island.


Hinges

Exposed hinges are usually found on more modern frameless kitchens which favor hidden Blum hinges instead.  If you have exposed hinges, consider chaning them out to match your new hardware.  All too often, over time, hinges wear and are often painted over.  


As a final note, one of the handiest tools you can have for your knob/pull project is a Fixta $3 hole drilling template from Ikea.  This helps people like me who aren't so hot with measuring to get it bang on the first time.


Friday, April 5, 2013

Quartz Counters and Red Wine Stains

I've you've been reading my blog, you know that I lusted after mable counters.  Marble is so beautiful but its stains something awful.  I opted to go with white quartz because quartz is suppose to be pretty stain proof.

After we paid the deposit for the quartz, I started googling and found some horror stories about white quartz and staining.  My heart sank.

We went ahead with the white quartz and I've been REALLY careful because I've been REALLY worried.

We had the family over for Easter dinner on sunday and cracked open a nice bottle of red wine we had been given by friends.  Can you see where this is going????


The house was busy and things didn't get cleaned up after the very filling Easter dinner.  I woke up monday morning to see a red wine ring on the corner of my island.

My heart nearly skipped a beat!

I didn't think to take a picture I just grabbed a dish cloth and scrubbed.

And guess what I saw?  Yup NOTHING.  Quartz counter 1 - red wine stain 0.